• Skip to main content
  • Skip to header right navigation
  • Skip to site footer
Call Ajaire

Call Ajaire

You can always Call Ajaire.

  • Blog
  • MashUp
    • Monthly MashUp
  • Designs by Call Ajaire
    • FREE PATTERNS
    • GIRLS
    • SWIM
    • OUTERWEAR
    • UNISEX
    • BUNDLES
    • DOLLS
    • FOR THE HOME
    • ADD-ON
    • SKILLS
      • Neckbands
      • Sewing Knits
      • Topstitching
      • Bagging a Lining
      • Bias Binding
      • Bound Buttonholes
      • Color Blocking
      • Exposed Zipper
      • Gathering Knits
      • Inseam Pockets
      • Handkerchief Hemline
      • Lined Bodice
      • Keyhole Neckline
      • Princess Seams
      • Narrow Hem
      • Neckbands
      • Sewing Outerwear
      • Sewing Swimwear
      • Sewing Knits
      • Tailored Coat
      • Tube Turning
      • Sports Waistband
      • Topstitching
      • v-neck Binding
      • v-neck Hood
      • Sewing with Faux Fur
      • Vented Hem
      • Working with Elastic
      • drawstring casing
    • Checkout
    • Designs by Call Ajaire on Etsy
    • Designs by Call Ajaire Facebook Group
  • About
  • My Account
  • Cart
  • Archive
  • Call Ajaire Facebook Page
  • Call Ajaire's YouTube Channel
  • @callajaire on Instagram
  • Ajaire's Pinterest
  • Call Ajaire on Twitter

Invisible Zipper Foot

For the Turquoise Maria dress I told you that I used an invisible zipper foot and I thought I should show you just how great this simple tool is.

When I heard about an invisible zipper foot from one of my Instagram friends I had to get one to try.  She said there was no need to bother with all of the metal and more expensive ones and that a boring old plastic one should do the trick.  So off to Amazon I went (*affiliate link).


When it arrived I thought maybe Shannon was nuts and that there was no way this little piece of plastic would work.  I could not have been more wrong.  It was sort of magical.  I decided to really try it out and not even baste anything the first time.  I have sewn a lot of zippers in my day and a great number of “invisible” zippers with just a regular zip and zipper foot, but I almost always have to baste first.  I’ve had great results, but who wants to do extra steps like basting and later picking out the basting stitches especially when you’re rushing through “rest time” to try to get something finished, hehe.

I’m making something fun for Valentine’s day right now so I used the invisible zipper steps from that project for these pictures.  Come back next week to see what this little sneak peek became.  The zipper installation is basically the same for a dress so just pretend the two sides are the back edges of a dress.

First, open the zipper and lay the teeth face down, lining up the edge of the zipper with the bodice edge and pinning.

Make sure the teeth are in the little channel on the left and that the sewing needle in the correct position – close to the teeth edge but not so close that the zipper would jam against the fabric when opened and closed.

Sew with a straight stitch all the way down to where you want the zipper to end and backstitch to secure the stitching.

Turn the zipper and fabric so the wrong sides are touching and press along the seam.  The teeth could melt with the heat of the iron so press with care.

For the other side, take a minute to line up the fabric against the closed zipper.  Mark a point where you would like the fabrics to meet.  In the Maria Turquoise Dress I used the edges of the turquoise band to ensure they would line up correctly once the zipper was zipped.

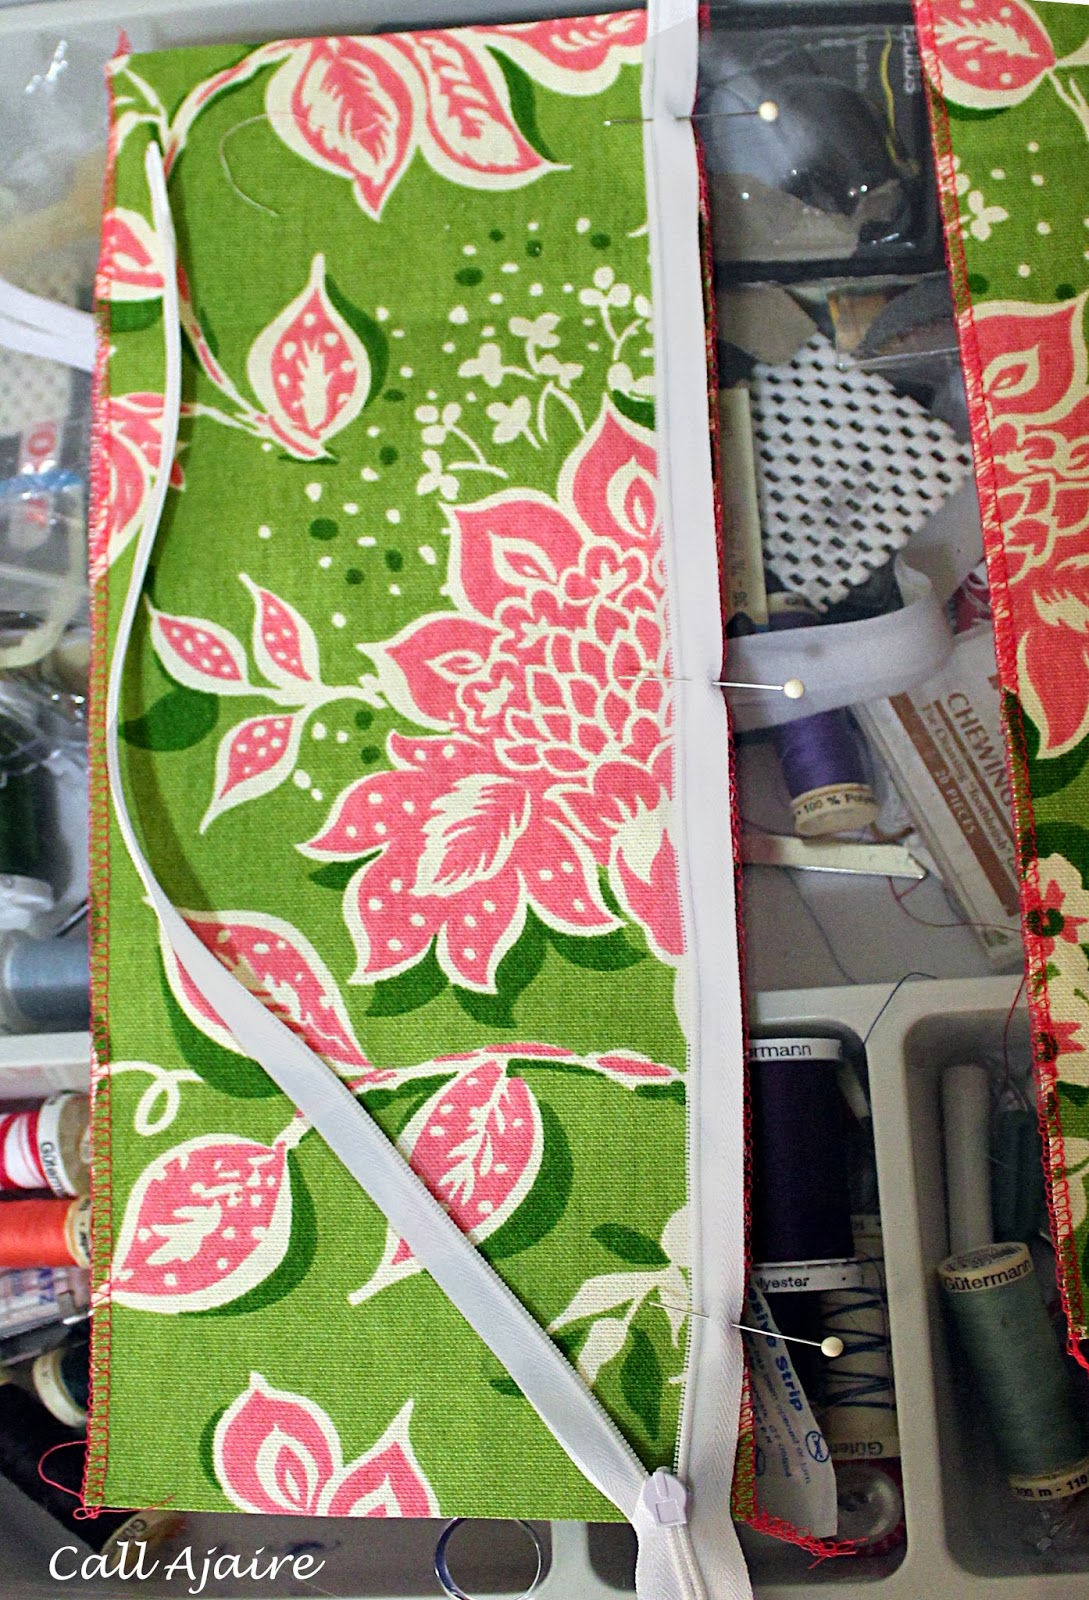
For this project I just chose a spot on one of the flowers and placed a pin on the zipper and on the unsewn edge to match.

Flip the zipper along with the sewn fabric edge so that the right side of the zipper faces the right side of the unsewn fabric piece.  Unzip the zipper, match the markings (pins) and pin the rest of the zipper.  With a garment I find it easiest to fold the whole thing in half with right sides facing to match the right side of the zipper to the right side edge of the back bodice.

To sew this edge the zipper teeth need to go through the right channel with your needle just to the left of the teeth.  Sew with a straight stitch to where you would like the zipper to stop and backstitch to secure the stitching.

As you can see in the picture above, the zipper pull is below where I would want the zipper to end so I could sew all the way to the correct spot without it getting in the way.  There is no problem zipping and unzipping the zipper past the stopping point because the stitching doesn’t cross over the teeth.  Once you finish sewing you can simply pull the zipper pull up above where the zipper should stop to finish the project.

Again, press the seams carefully so that the zipper and fabric are wrong sides facing.

And that’s it.  From here you would just finish the garment as you normally would taking care not to hit the zipper teeth when sewing across the bottom and top edges.  If your zipper is too long you can apply any shortening method you’d like and then trim it to size.  There are lots of tutorials out there for shortening a zipper, but let me know if you have any questions.

Any seam that needs to be sewn below the zipper can be sewn with right sides together as close to the zipper as possible while you make sure the zipper is pulled out of the way.

Can you believe how invisible that zipper is?  The fabric doesn’t catch in the teeth at all, but the zipper just disappears into the seam when it is closed.  In this case the flower pattern doesn’t match up exactly, but I wasn’t trying to get an exact match.  You can certainly see how a little bit of fussier cutting would make a perfect match though.

This simple sewing machine foot has changed the world of zippers for me and I hope it does for you too.  I love finding new ways of doing things even after all this time.  We are never finished learning are we?  What about you?  Do you have any sewing tools that have totally changed your sewing skills?

Reader Interactions

Comments

  1. Paisley Roots

    January 30, 2014 at 8:39 pm

    Wonderful tutorial!! And amazing job at lining that up!

    Reply
  2. Sparkling

    January 31, 2014 at 12:09 am

    Now that I think about it, whatever machine I used for that one perfect invisible zipper that I did had the zipper foot that has the plastic with the channels. I think I thought it was just a regular zipper foot, not an invisible one. And it makes sense that when I got my machine the zipper foot looked funny to me becuase it's not invisible. I think it was on moms old ken more.

    Reply

Leave a Reply Cancel reply

Your email address will not be published. Required fields are marked *

This site uses Akismet to reduce spam. Learn how your comment data is processed.

Sidebar

Privacy & Cookies: This site uses cookies. By continuing to use this website, you agree to their use.
To find out more, including how to control cookies, see here: Cookie Policy

Looking for something?

join us on instagram

callajaire

Proof that my children are spoiled 😆😆 This Proof that my children are spoiled 😆😆

This gorgeous Luxe Cuddle throw in Arctic Rabbit Bayou is going to my 6th grader and she may never get out of bed again. 🤷🏼‍♀️🤷🏼‍♀️
#shannonfabrics #shannonfabricscuddle #luxecuddlearcticrabbit
I had fun pulling through my @shannonfabrics Cuddl I had fun pulling through my @shannonfabrics Cuddle scraps for the @postalthreads fillable egg swap again this year! 🥚🥚🐣🐣

These fun (and soft) blue sparkly eggs were sent off to my swap partner today 💕💕
(I’ll post a finished pic once I’m sure it’s been received)

#fabriceggstravaganza #PTeggswap2023
So excited to finally get my hands on this Cloud C So excited to finally get my hands on this Cloud Cuddle!  I was a huge fan of the old Spa Cuddle which was double sided and have been missing it so much!  Now that this super soft double sided cuddle is available, I can’t wait to get sewing 💕💕
(Fabric choices picked by the 6th grader 😆😆😍😍)
#shannonfabrics #shannonfabricscuddle #cloudcuddle #shannoncuddle
We had great time away this weekend, even though t We had great time away this weekend, even though there was no snow (so no snowmobiling, naturally) in the Poconos. In spite of how it looks in the pics even the tween enjoyed herself 🙄😆😆 

Thanks to @staytherex for the lovely accommodations 💕💕
When your baby isn’t feeling well and all the th When your baby isn’t feeling well and all the things get canceled, you take the time to make a new snuggly blanket in her favorite colors, just the right size for her toddler bed. 💕💕

#shannonfabrics #shannonfabricscuddle #shannonfabricsluxecuddle
Current status. So proud of you @patrickhinds_ 😘😘
Fun Valentine’s Day craft with our Moms Rekindle Fun Valentine’s Day craft with our Moms Rekindled group @redeemer.lutheran this morning 💕💕
I made some new step outs for the Larry the Lion c I made some new step outs for the Larry the Lion class I’m teaching at @sewspecialinc this week, so I thought I’d finish up this girl who was made up of my previous ones. She’s perfect for Valentines Day 💕💕

#funkyfriendsfactory #shannonfabrics #shannonfabricscuddle
Instagram post 17881763630739525 Instagram post 17881763630739525
Load More... Follow on Instagram

Affiliates:

Seven Sisters Scones


Jennuine-Design-Banner

Designs by Call Ajaire

Designs by Call Ajaire shop logo

Archives

Recent Posts

  • Project Jet Set – Sardinia With the Rimini Romper
  • Project Jet Set – Travel Pattern Capsule – Sardinia
  • Very Peri Pantone Party
  • Project Happy Holidays – the Galentine’s Shoot
  • Project Happy Holidays – a Collaboration

Subscribe to Call Ajaire via Email

Enter your email address to subscribe to Call Ajaire and receive notifications of new posts by email.

Designs by Call Ajaire

Designs by Call Ajaire shop logo

I've always loved making. At an early age I started cross stitching and sewing and I taught myself to knit and crochet during college. When our seven year old daughter Bean was born I was filled with all sorts of inspiration, so now I find ways to manage my crafty time and treasure those moments. Though sewing is what I'm most passionate about these days, there's something about the portability of yarn crafts and embroidery that keeps drawing me back in. Read More…

Join our newsletter!

Stay up to date with exclusive offers and coupon codes in your inbox!

Quick Links

  • About Call Ajaire
  • My Account
  • Blog
  • Contact Page

Shop

  • Designs by Call Ajaire
  • FREE PATTERNS
  • Cart
Call Ajaire

Copyright © 2023 · Call Ajaire · All Rights Reserved · Powered by Mai Theme